

Ultimate Guide to Festival Crowd Photography
Photographing festival crowds is about telling the story of the event - the energy, the interactions, and the atmosphere. Here's what you need to know:
Gear: Use full-frame mirrorless cameras (like Sony A7 IV or Canon R6 II) for low-light performance and fast autofocus. Essential lenses include a 24–70mm f/2.8 for versatility, a 70–200mm f/2.8 for long-distance shots, and fast primes (35mm or 50mm) for low-light moments.
Settings: Shoot in RAW, use wide apertures (f/1.4–f/2.8), and adjust ISO for lighting conditions. Continuous autofocus (AF-C) and spot metering help track subjects and maintain exposure.
Positioning: Scout venues early for the best angles. Look for elevated spots or unique perspectives to showcase scale and crowd dynamics.
Composition: Focus on depth, human expressions, and crowd interactions. Mix wide-angle shots with close-ups for variety.
Editing: Prioritize natural adjustments to shadows, highlights, and white balance. Use color grading to match the mood of each moment while maintaining consistency across your gallery.
Festival photography is about more than just performers; it's about the connection between the crowd and the event. By planning ahead, staying mobile, and thinking creatively, you can create images that truly reflect the spirit of the festival.
How You're Photographing Festivals in 2026 (What Pros Gatekeep)
Gear You Need for Festival Crowd Photography
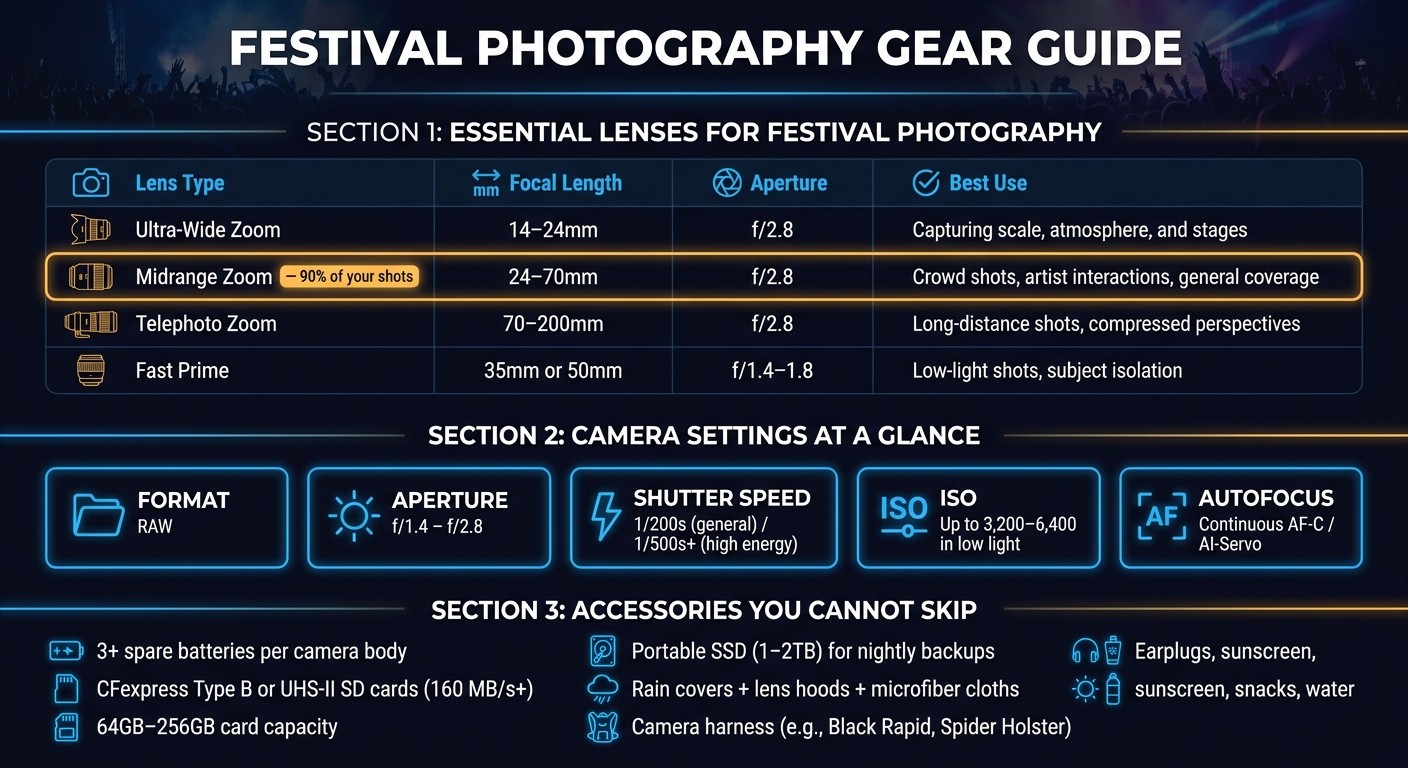
Festival Photography Gear Guide: Lenses, Settings & Accessories
Festival photography is no walk in the park. It’s long hours, unpredictable conditions, and constant movement. Your gear needs to deliver top-notch results while keeping you comfortable and efficient throughout the day.
Cameras and Lenses
When it comes to cameras, full-frame mirrorless models are the go-to choice. Options like the Sony A7 IV, Canon R6 II, and Nikon Z6 III excel in low-light conditions and offer fast, reliable autofocus - ideal for capturing fast-moving subjects in chaotic environments. While APS-C cameras are lighter and give extra reach for telephoto shots, they can struggle with noise and dynamic range, especially under challenging festival lighting.
For lenses, a versatile kit typically includes three f/2.8 zoom lenses: an ultra-wide (14–24mm), a midrange (24–70mm), and a telephoto (70–200mm). Among these, the 24–70mm f/2.8 is the workhorse lens you'll use most often.
"The 24-70mm will get you pretty much 90% the way there, and then primes are there to give you something creative to work with that sets your work apart from the rest." - James Bridle, Festival Photographer
Fast prime lenses, like a 35mm f/1.4 or 50mm f/1.8, become indispensable after dark. They let you shoot with lower ISO settings while creating beautiful subject isolation with shallow depth of field. Carrying two camera bodies - one with the 24–70mm and another with the 70–200mm - saves you from swapping lenses in crowded, dusty environments, ensuring you’re ready for any shot.
Lens Type | Focal Length | Best Use |
|---|---|---|
Ultra-Wide Zoom | 14–24mm f/2.8 | Capturing scale, atmosphere, and stages |
Midrange Zoom | 24–70mm f/2.8 | Crowd shots, artist interactions, general coverage |
Telephoto Zoom | 70–200mm f/2.8 | Long-distance shots, compressed perspectives |
Fast Prime | 35mm or 50mm f/1.4–1.8 | Low-light shots, subject isolation |
Accessories and Must-Have Items
A single day at a festival can easily drain two to three camera batteries, so pack at least three spares for each body you’re using. For memory cards, invest in CFexpress Type B or UHS-II SD cards with read/write speeds of at least 160 MB/s. This ensures smooth burst shooting and prevents delays when the action is at its peak. Stick to larger-capacity cards (64GB, 128GB, or 256GB) so you don’t have to stop mid-shoot to swap them out.
Weatherproofing is essential. Rain covers, lens hoods, and microfiber cloths are your first line of defense against dust, glitter, and sudden rain showers. For multi-day festivals, back up your photos every night using a portable SSD (1TB or 2TB) to avoid losing precious shots to card failure.
"Music festivals are the marathons of live music photography, and ample amounts of storage are just as important as having the batteries to power your cameras." - Todd Owyoung, Professional Music Photographer
Don’t overlook personal essentials like earplugs, sunscreen, snacks, and water. Staying prepared for the physical demands of the day is just as important as having the right camera gear.
How to Stay Mobile at a Festival
Carrying your gear efficiently is just as critical as choosing the right equipment. A traditional neck strap can quickly become a burden, putting unnecessary strain on your shoulders and back. Instead, opt for camera harnesses like the Black Rapid dual strap or modular systems like the Think Tank belt or Spider Holster, which shift the weight to your hips and legs for better support.
For smaller items - batteries, memory cards, cleaning cloths, or even snacks - a lightweight sling bag or compact backpack like the Peak Design Everyday Backpack or Think Tank Turnstyle allows quick access without needing to remove the bag entirely. This setup helps you navigate crowded spaces while staying organized and efficient.
If you want to streamline further, stick to the essentials: one camera body, one versatile zoom lens, and a fast prime for backup. This minimalist approach often covers everything you’ll need for a full day of shooting.
Camera Settings for Festival Photography
With your gear set, it’s time to fine-tune your camera settings to capture the fleeting magic of a festival.
Settings for Low Light and Moving Subjects
Getting sharp, well-lit shots in low light or with fast-moving subjects is all about the right setup. Start with a wide-open aperture (like f/1.4, f/1.8, or f/2.8) to let in more light. Pair this with a shutter speed of at least 1/200s for general movement, or 1/500s or faster for high-energy moments. If light is scarce, don’t hesitate to raise your ISO to 3,200 or even 6,400 - better a bit of grain than a blurry shot. As concert photographer Todd Owyoung puts it:
"I'll always take more digital noise/grain over a blurry image. Don't be afraid to crank the ISO when you need it."
Always shoot in RAW. This format gives you the flexibility to recover details in shadows, tweak exposure, and adjust white balance during editing.
Autofocus and Exposure Compensation
Capturing moving subjects is easier with Continuous Autofocus (AF-C/AI-Servo). For low-light situations, rely on the center autofocus point, which is typically the most sensitive. If you’re tracking subjects across the frame, modes like 3D Tracking or Auto Area AF can help your camera follow the action seamlessly.
For metering, use spot metering to properly expose key subjects like performers, or switch to matrix/evaluative metering for crowd shots. Back-button focus is another trick that allows you to quickly recompose without losing focus on your subject. These settings ensure your camera keeps up with the ever-changing pace of a festival.
Shooting in Changing Light Conditions
Festivals often take you through a full spectrum of lighting - from bright midday sun to golden hour, then into colorful stage lights and eventually low light after dark. During daylight, stick with standard apertures and lower ISOs. As the light fades, open your aperture and increase ISO to maintain fast shutter speeds.
For shifting light, manually set your white balance to a range like 5,000K–7,000K or use the "Cloudy" preset. This helps you avoid the cool tones that Auto WB might introduce. Todd Owyoung advises:
"Pre-setting your white balance for stages that are in shade can help warm up scenes that might otherwise come off as a little cool with auto WB."
Locking in your white balance not only keeps the natural tone of your shots intact but also reduces the need for adjustments during editing.
Positioning and Timing Your Shots
Once your settings are locked in, the next step is all about positioning yourself and timing your shots to capture the festival's energy and atmosphere.
How to Scout the Best Shooting Spots
Getting to the venue early - before the gates open - is a game-changer. It allows you to explore the space without the crowd and identify the best vantage points. Elevated spots like hills, bleachers, media platforms, or even a portable step stool can give you a clear view of both the stage and the audience, which is crucial for showcasing the event's scale.
Take time to study the stage setup. Pay attention to the placement of LED screens, lighting rigs, and other key elements so you can plan your angles before the light show kicks off. Look for natural sightlines that can help frame your shots, like flags, totems, or pathways, which will stand out even more once the crowd fills in.
Pro tip: Set the festival schedule as your phone's lock screen. This makes it easy to check stage times and locations at a glance, helping you stay on top of the action.
Reading the Crowd for the Right Moment
Great festival images don’t just happen - they’re the result of careful anticipation. Photographer Chris Sidoruk sums it up perfectly:
"The best festival images usually come from... understanding when something is building before it happens."
Keep an eye out for subtle cues: a performer stepping closer to the edge of the stage, a DJ building up to a drop, or a singer reaching out to the crowd. These moments often lead to the most dynamic reactions - raised hands, jumping fans, or a wave of energy surging through the audience. The key is to be ready before the moment peaks, not after.
Don’t just focus on the high-energy moments, though. Quiet, reflective pauses can add depth to your visual story, capturing the emotional range of the event. Festival promoters especially value images that showcase the full spectrum of emotions, from the wildest moments to the more intimate ones.
Moving Through the Venue
Navigating a packed festival venue can be tricky, but patience and awareness go a long way. Use a "zone defense" approach: find a strong position, stick to it, and move slowly when necessary. Stay low to avoid blocking others' views and maintain clear sightlines.
If you’re shooting in a photo pit, it’s good etiquette to move toward the back for overhead or wide-angle shots. This not only gives you a unique perspective but also keeps you from obstructing other photographers. As festival photographer James Bridle advises:
"Don't be a D*ck. Is a good rule to live and work by."
A lightweight mirrorless camera setup can make all the difference during a long day. It allows you to shift positions quickly and efficiently without wearing yourself out, giving you the flexibility to capture every essential moment.
How to Compose Strong Crowd Shots
When it comes to festival photography, composition is what brings your images to life. While your gear and settings lay the groundwork, the way you frame your shots is what truly immerses viewers in the energy of the event. Festival photographer James Bridle sums it up perfectly:
"The best photographers are selling a feeling of what it's like to be at the event."
Your composition is the bridge between a static image and the vibrant atmosphere of a festival. To capture that energy, focus on depth, human interactions, and creative perspectives.
Using Depth and Scale in Your Frame
Flat, one-dimensional shots don’t do justice to the dynamic energy of a festival. Instead, create layers in your photos by placing an element like raised hands, a totem, or even a barrier in the foreground, while the crowd or stage fills the background. This approach instantly communicates scale and energy. Wide-angle lenses are your best friend here - they let you capture the density of a crowd while keeping the stage or venue context intact.
Shooting Crowd Interactions and Expressions
The crowd is as much the story as the performers themselves. Bridle emphasizes this point:
"The crowd at festivals and music events is just as - if not more important than the artist."
Some of the most memorable shots happen in the space where the audience and performers connect: a singer reaching toward fans, people belting out lyrics, or strangers bonding over a shared moment during a beat drop. Don’t overlook quieter moments, though. A couple relaxing on the grass during a slower song or someone lost in the music with eyes closed can add emotional depth to your coverage. These candid, human moments tell a fuller story of the festival experience.
Trying Different Angles and Perspectives
Switching up your angles keeps your photos fresh and dynamic. Shoot from within the crowd for immersive, ground-level shots, and don’t shy away from high-angle or aerial perspectives to capture the sheer scale of the venue. Fast prime lenses, like a 35mm or 50mm, are great tools for isolating individual subjects and creating intimate portraits. By mixing wide, sweeping shots with tight, focused portraits, you’ll add variety to your coverage and give your final edit a layered, storytelling quality that resonates with viewers.
Editing Your Festival Photos
Great festival photos don’t end with the click of a shutter. The real magic often happens in post-production, where edits bring the moment back to life.
"The goal is not to over-process your images. The goal is to bring them back to what the moment actually felt like."
Once you’ve captured the raw energy of the festival, editing allows you to shape that energy into a cohesive and visually compelling story.
Basic Editing Adjustments
Start by sorting through your photos - eliminate weaker shots so you can focus on the best ones. Then, move on to the fundamentals:
Shadows, Highlights, and Blacks: Adjust these to bring out details and add depth.
Clarity: Use sparingly to enhance texture without making the image look harsh.
White Balance: Manually tweak this to keep the vibrancy of festival lighting intact.
HSL Controls: Tone down any overpowering colors to maintain a balanced look.
Noise Reduction: Be cautious here. A bit of grain can add character to low-light shots, but over-smoothing can make them look artificial.
The goal is to enhance the atmosphere of the festival without losing its authenticity. Once the basics are in place, you can move on to color grading to set the mood.
Color Grading for Festival Mood
Color grading is where your photos find their personality. Instead of relying on presets, tailor your edits to match the mood of each moment. For example:
Warm, golden tones: Perfect for late-afternoon or sunset crowd shots, evoking a laid-back vibe.
High-contrast black-and-white: Ideal for dramatic moments like a mosh pit, a performer’s emotional connection with the crowd, or a sea of raised hands.
As Sidoruk puts it:
"Your editing should support the atmosphere of the event without turning everything into the same heavy-handed look."
The goal is to enhance the mood without overwhelming it.
Here’s a quick guide to common editing styles and their best uses:
Style | Characteristics | Best Used For |
|---|---|---|
Clean and Natural | Balanced colors, minimal contrast | Daytime crowds, editorial or press use |
Dark and Moody | Deeper blacks, dramatic highlights | Night performances, intimate moments |
High Energy | Bold contrast, vibrant colors | Intense crowd reactions, peak performances |
Keeping Your Edits Consistent Across a Set
Consistency is what transforms a collection of photos into a polished gallery. To achieve this, pick one standout image as your “anchor.” Fully edit that photo, then apply the same settings to similar shots, making small adjustments as needed. This approach not only saves time but also ensures a unified look across your gallery.
Organizing your files is just as important. Use descriptive file names or add keyword metadata to group similar scenes together. This makes it easier to compare and edit related images in batches.
"Consistency matters more than perfection."
A well-edited, cohesive set that tells a story will always leave a stronger impression than a collection of technically flawless but mismatched images.
Conclusion: Telling a Story With Festival Crowd Photos
Festival crowd photography isn't just about snapping pictures - it's about conveying an atmosphere. The most compelling photo sets mix the high-energy buzz of performances with quieter, intimate moments. Think of a fan relaxing on the grass, two strangers sharing a laugh between sets, or the warm glow of festival lights at dusk. These small details anchor your images in a specific time and place, making them feel alive.
While gear and shooting strategies are important, the essence of great photography lies in capturing the feeling of being there. Anticipating the right moment often matters more than any setting or lens choice. Every decision you make - whether it's about equipment, timing, or composition - should aim to reflect the vibrant energy of the festival crowd.
Ultimately, the relationship between the performers and the audience is the soul of every festival story. Every angle, every frame, should work to highlight this connection.
"The crowd matters more. The better you get at capturing the crowd and the relationship between the artist on stage and the people buying tickets, the better and more successful you will be." - James Bridle
As you refine your style, focus on the crowd - the heart of every festival narrative. The photographers who truly stand out, like those collaborating with agencies such as Future Gold Media, are the ones who look beyond the stage and capture the magic happening all around it. With each event, your style will evolve. Stay curious, stay flexible, and let the energy of the moment guide your lens.

Let’s keep in touch.
Discover more about high-performance web design. Follow us on Twitter and Instagram.
